Deploy Evolution: AWS Serverless Feedback Platform
Deployment is probably one of the hottest topics debated by modern software engineers since it’s hard to face so many pitfalls and unexpected errors anywhere as during this procedure.
This is the story of one project, a feedback platform based on the semantic feedback analysis, that finally led us to the current stage of our deploy evolution. We’ll tell you how we implemented the product, by changing numerous deployment approaches to reach the expected results.
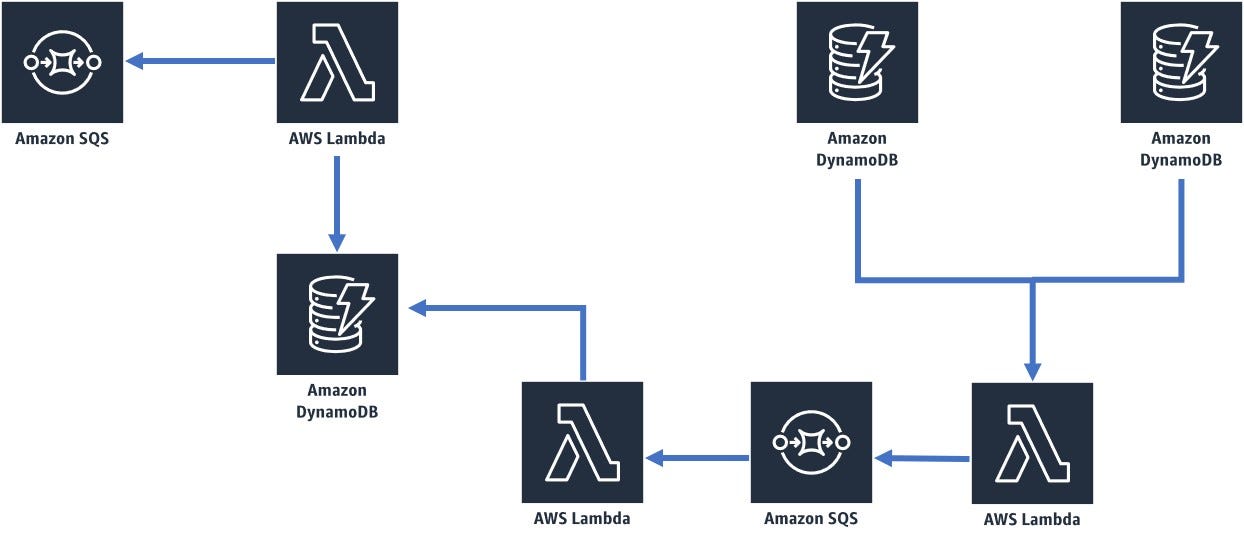
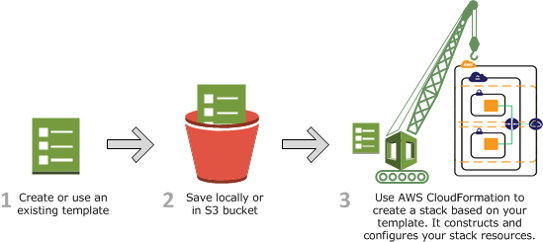
Without going into great detail explaining how the semantic analysis works, we’ll primarily talk about infrastructure. We used the basic services: AWS Lambda, Amazon DynamoDB and Amazon SQS, built-in Amazon web services. Quite a standard set, as you know. You can see how all these infrastructure components were connected on the scheme.
Deployment Time
It was time to deploy the first lines of code, and here is how we did it.
The first tool for deploying Lambda was Octopus Deploy. It’s a multiplatform service with a sophisticated deployment functionality. Its features include the following:
- Consistent Releases Control
- Packaging Applications
- Continuous Delivery Pipeline (Smart product lifecycle management depending on the project specifications, i.e., compliance with the complex rules when we need a test after the development or the use of our pipeline for immediate deploy into production.)
Also, Octopus provides a brilliant standard module, Lambda Deploy, which made us think that we could instantly deploy the project into the ready module. The problem is that you can deploy only code.
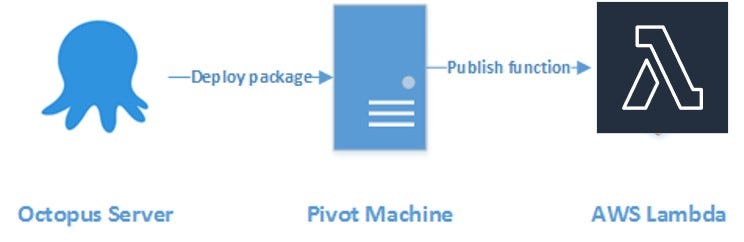
For a live project with a logically connected database and SQS, we require a strict infrastructure and environment: already assigned roles, security groups, VPC (AWS private cloud), etc. Octopus allows you to update only the Lambda code that is enough at the first 5–10 stages. Using it, you can add a ready element, which searches for a resource by name and deploys a code there by leaps and bounds.
Infrastructure as Code (IaC)
Our project was evolving. We’ve added new modules and dependencies. A lot of specialists were involved in development. So we faced the next challenge: the necessity to ensure a good “project inheritance” between different teams. We needed to clearly understand how everything was connected and worked together beyond Lambda code.
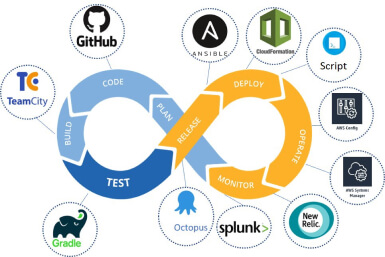
That’s why we introduced a new approach, infrastructure as a code. The graphics below present one of the most popular IaC visualizations.

Its main merit is clearly defined input/output points, which allow you to delete or replace any of these eight elements. We’re interested only in the orange part of this scheme, associated with deployment.
What tool to choose for describing the infrastructure and deployment?
Let’s consider what our requirements were:
- Flexibility. In one script, we needed to manage not only AWS but also other components and dependencies still located in the data center.
- Universal templates that could be applied outside the project, within the campaign. Instead of disturbing development teams with requests to come up with new interactive solutions, we decided to compose reusable components, which could be quickly adjusted to a certain part of the project just by changing input variables.
The well-known AWS CloudFormation didn’t suit these goals as we needed to change third-party components. Thus, we chose Ansible.
Ansible Playbook Workflow
This scheme demonstrates how the Ansible Playbook workflow is arranged.
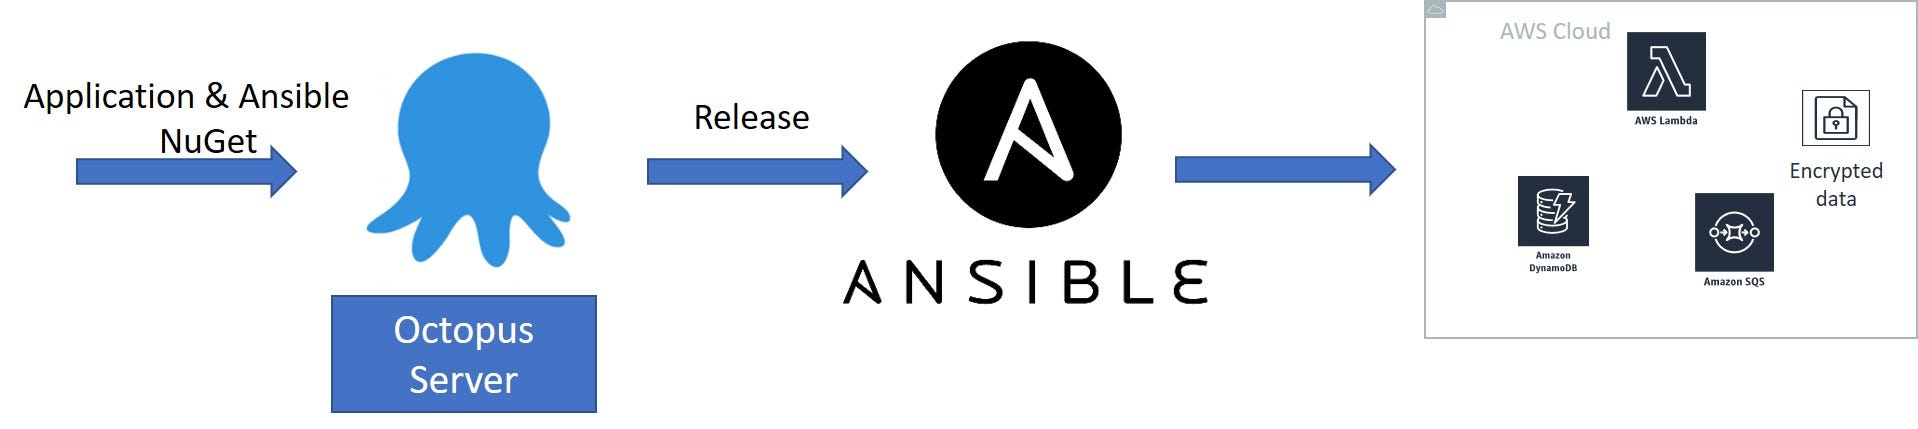
Let’s analyze these mechanisms step-by-step:
- TeamCity packs NuGet with an application and a piece of Ansible playbook.
- Octopus Server “eats up” the prepared NuGet packet and launches Ansible Playbook.
- Ansible Playbook creates one AWS Cloud or a lot of clouds at once, the so-called architecture bricks.
This is the typical Ansible structure:
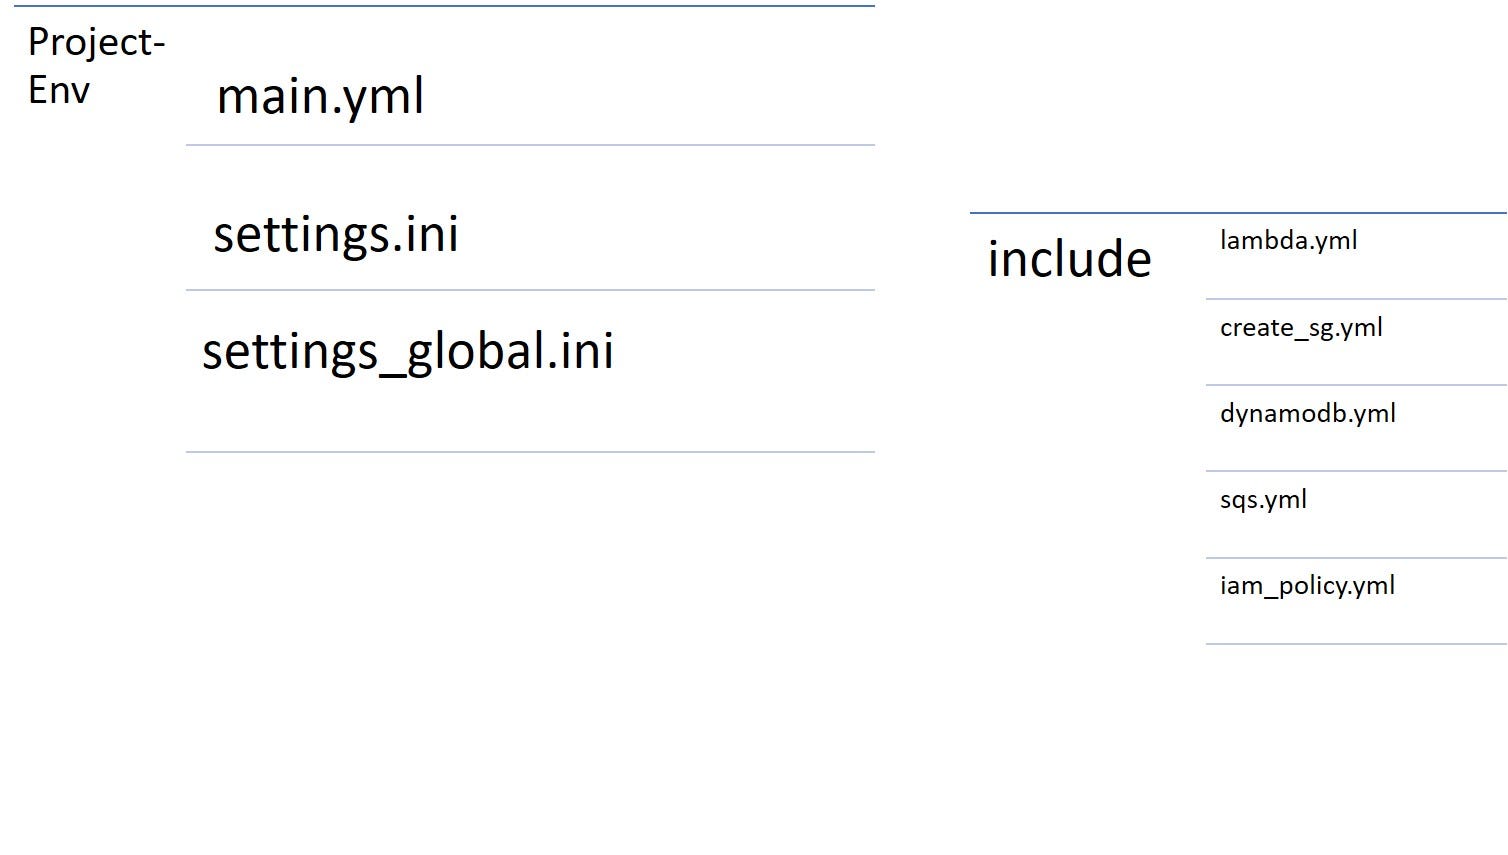
The category “include” presents the standard components — the architecture bricks obtained in the third step. They are the foundation for a separate module. Each of them fulfills a small task: creates IAM policy, a security group, SQS queue, and so on, thereby, covering the entire project stack.
You can share the “include” folder with other teams, so they don’t need to dig deep into the puzzle to see how everything works. All dependencies (the purpose of each component and their interaction) are described in the main.yml file.
You can see an example of main.yml file below:
name: deploy Out-Sched
  hosts: 127.0.0.1
  connection: local
  vars:
    env_prefix: dev
    state: present
    aws_region: us-east-1
    vpc: vpc-11
    sg: sg-00
    name_role: lambda-out
    subnets: ['subnet-00', 'subnet-11']
    iam_policy_doc: out_sched_policy_nonprod.json
    resources_tags: "Environment={{env_prefix}},Module=2,Product=1,deployed_with=https://build.com:4443"
tasks:
    - include: includes/iam_policy.yml
    - include: includes/dynamodb.yml dynamodb_table={{item.dynamodb_table}} stream={{item.stream}} read_capacity={{item.read_capacity}} write_capacity={{item.write_capacity}}
      with_items:
      - dynamodb_table: "{{env_prefix[:1]}}_Out_Sched"
        stream: 'no'
        write_capacity: '2'
        read_capacity: '2'
- include: includes/dynamodb_noindex.yml dynamodb_table={{item.dynamodb_table}} stream={{item.stream}} read_capacity={{item.read_capacity}} write_capacity={{item.write_capacity}} hash_key_name={{item.hash_key_name}} hash_key_type={{item.hash_key_type}} range_key_name={{item.range_key_name}} range_key_type={{item.range_key_type}}
      with_items:
      - dynamodb_table: "{{env_prefix[:1]}}_Out_Sched_Data"
        stream: 'no'
        write_capacity: '2'
        read_capacity: '3'
        hash_key_name: 'AttemptId'
        hash_key_type: STRING
        range_key_name: ''
        range_key_type: STRING
- include: includes/create_sqs.yml name={{env_prefix[:1]}}-out-queue-dead-letter timeout=30 dl_arn=""
    - include: includes/create_sqs.yml name={{env_prefix[:1]}}-out-input-dead-letter timeout=30 dl_arn=""
In main.yml file you can see a description of dependencies. Also there is a standard .ini file, in the [main] section of which we specify all variables. In the following sections (environments), e.g., in [dev] or [prod], we can remold the parameters. It’s a standard approach to the settings.ini files:
[main]
runtime=dotnetcore2.1
handler=SearchIndexer.Function::FunctionHandler
zip_file=*.SearchIndexer.*.zip
[dev]
role=arn:aws:iam::00:role/lambda-nonprod
memory_size=2048
timeout=900
cron_scheduler=cron(0/15 * * * ? *)
envs={
    "BATCH_SIZE": "10000",
    "DB_CONNECTION_SECRET": "d-lambda-connection",
    "ODB_CONNECTION_SECRET": "d-lambda-connection",
    "ELASTIC_URI": "https://v.es.amazonaws.com/",
    "REGION": "us-east-1",
    "ETL_MODE": "Incremental"
    }
[test]
role=arn:aws:iam::00:role/lambda-nonprod
memory_size=2048
timeout=900
cron_scheduler=cron(0/15 * * * ? *)
envs={
    "BATCH_SIZE": "10000",
    "DB_CONNECTION_SECRET": "t-lambda-connection",
    "ODB_CONNECTION_SECRET": "t-lambda-connection",
    "ELASTIC_URI": "https://es.amazonaws.com/",
    "REGION": "us-east-1",
    "ETL_MODE": "Incremental"
    }
[stage]
role=arn:aws:iam::00:role/lambda-nonprod
memory_size=2048
timeout=900
cron_scheduler=cron(0/15 * * * ? *)
envs={
    "BATCH_SIZE": "10000",
    "ECONNECTION_SECRET": "s-lambda-connection",
    "OCONNECTION_SECRET": "s-lambda-connection",
    "ELASTIC_URI": "https://es.amazonaws.com/",
    "REGION": "us-east-1",
    "ETL_MODE": "Incremental"
    }
[prod]
role=arn:aws:iam::00:role/lambda-prod
memory_size=2048
timeout=900
cron_scheduler=cron(0/15 * * * ? *)
envs={
    "BATCH_SIZE": "10000",
    "ECONNECTION_SECRET": "lambda-connection",
    "OCONNECTION_SECRET": "lambda-connection",
    "ELASTIC_URI": "https://.es.amazonaws.com/",
    "REGION": "us-east-1",
    "ETL_MODE": "Incremental"
    }
Let’s consider a common situation when you want to change something in production. Although production environment differs from the dev one, in this system, it’s quite easy to describe changes.
If you want to change something in your stack, whether it is an addition of the .env variable, you don’t need to scan all four files. Everything is changed in one place. Sounds pretty cool, right?
Ansible: Why Not
The Ansible Playbook approach met a lot of our objectives, and we applied it to other projects. However, if things had been perfectly, we wouldn’t name this article Deploy Evolution. It turned out that the Ansible’s devil is in the details.
- Absence of the rollback possibility. Ansible doesn’t provide any standard mechanisms and tools to rollback deployed changes. To do this, you should describe the rollback logic on your own, thereby, increasing your code twice.
- No logical validation of playbook. If you miss something, some surprises, usually not pleasant ones, may appear during deployment. You can implement a dry-run and check tests, but only in standard AWS Ansible modules.
- Host-specific. It’s quite difficult to deploy and update already existing resources.
- Partial deployment. The problem is there are so few of the built-in AWS modules. And they aren’t enough to cover the whole scope of AWS components, just the basics.
In fact, these are not the problems of Ansible platform itself but the peculiarities of the AWS modules. We couldn’t redevelop and maintain AWS stack in Ansible, thus, we decided to explore the dear old CloudFormation once again.
Switching to AWS CloudFormation
Our relationships with CloudFormation weren’t idyllic at the outset. And here are the apparent reasons why:
CloudFormation Cons
1. At the very beginning, we had a fundamentally insurmountable pitfall: a mixed infrastructure. However, the time passed and almost all of our active components turned out to be built-in AWS. We literally refused other third-party platforms.
2. The second problem was the absence of custom logic in CloudFormation, which means that you can’t make any logic operations toward the components. You can’t customize your infrastructure.
3. The last obstacle was that CloudFormation was lagging behind AWS releases. If Amazon launches some new feature, it will synchronously appear in the SDK or the AWS CLI but not in CloudFormation. Thus, you can wait for a month for one minor update to be synchronized.
Luckily, we managed to find some practical loopholes.
Customization with CF
There are two conventional approaches to making customization:
- Lambda and AWS SDK. Allows you to form some non-standard logic or case. All you need is to create Lambda in your favorite programming language, and then, AWS will do the rest of the work for you.
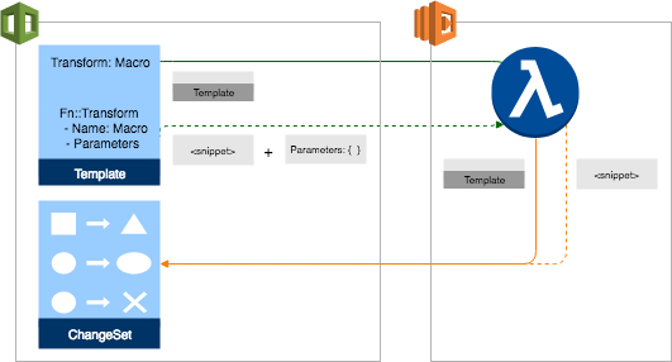
- CloudFormation macros. Recently appeared CF macros are the same Lambdas, but now they are a logical part of your template, which return facts and dependencies. You can apply your logic to the returned dependencies.
That is how we easily overcame two crucial problems from the previous point. The only unresolved issue was a non-AWS environment, which meant the impossibility to deploy something else via CF. However, we moved major projects and components to AWS so we didn’t need it anymore.
CloudFormation Workflow
Good news is that when switching to CloudFormation, we almost repeated the Ansible Playbook’s workflow.

The difference is the replaced Ansible Playbook with CloudFormation template. Octopus verifies the template via AWS CLI and deploys it. As a result, we get the same group of “bricks.”
It’s remarkable to note that if something goes wrong, CF will take care of rollback. In this aspect, CloudFormation dramatically surpasses Ansible, as it allows you to rollback required changes immediately.
However, keep in mind that CF isn’t good when you need to change some old, long-unsupported legacy pieces during deployment. Actually, it was not a pivotal drawback since we implemented a new product with backward compatibility. The former components were still stored according to the IaC scheme. We just transferred them to CF.
CloudFormation Pipeline
The graphics below illustrate the common process pipeline that we followed.
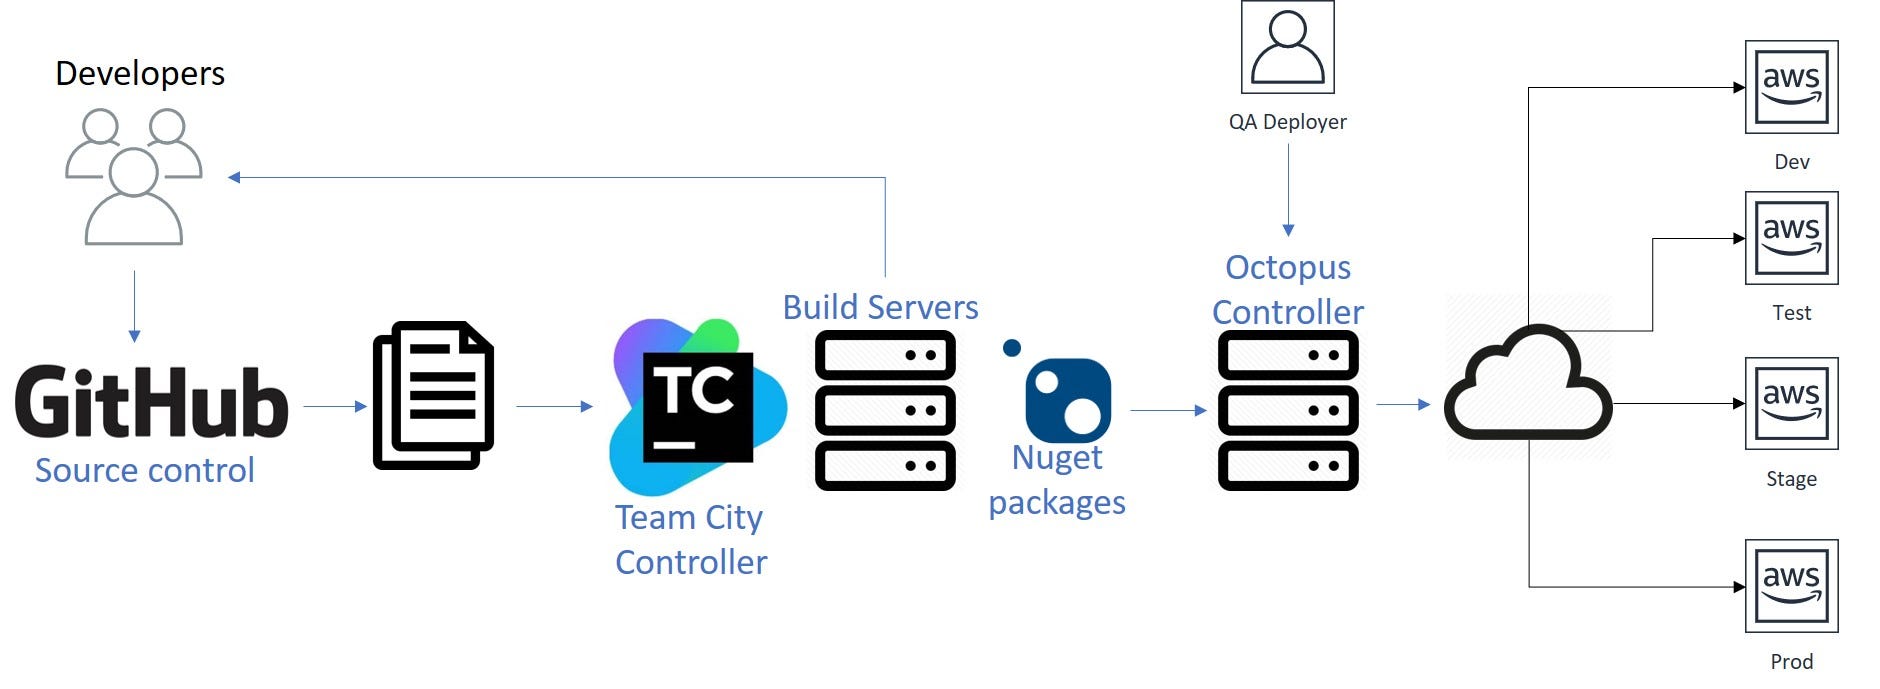
As you can see, our steps were the following:
- We wrote code and pushed it to GitHub.
- TeamCity found it, collected all of our artifacts, made the project build, and pushed all these data to Octopus.
- Octopus deployed the obtained package to dev, which was accompanied by verification and tests.
- QA engineer took over the baton, monitored test results and decided what to do with the release next.
- Dev -> Stage -> Test -> Prod.
Hooray, our deployment was successful!
Ansible vs. CloudFormation
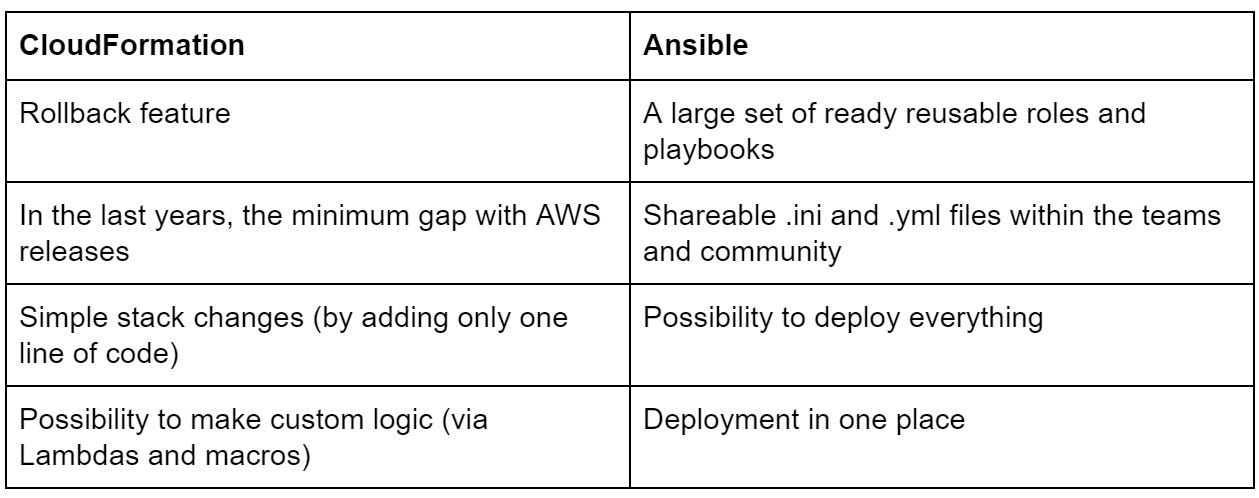
In summary, let’s determine which tool to choose for your deployment operations.
Both Ansible and CloudFormation can be used. Make your choice based on this short comparison table, which presents the platforms pros:
All in all, you always can choose the third option.
Just Reinvent
There are no impossible tasks. Something that can’t be performed through the existing tools, we can build on our own, by writing a required script.
We’ve all started working this way when there was neither CloudFormation nor Ansible. Don’t be afraid to create the missing piece of deployment or even implement the whole thing from scratch. It would be the highest stage of your deployment evolution.
WANT TO KNOW HOW TO DESIGN A HEALTHCARE DATA PLATFORM?
Learn about our approach to building an agile ecosystems with an architecture of multiple secure data layers, distributed storage and internal and external APIs.