How to Migrate Your App to Kubernetes?
Everyone wants to have their app running on Kubernetes. But how to start this process? What steps should be performed? How to estimate the effort?
Many development teams are only starting their K8s journey. Despite the popularity of Kubernetes in recent years, there are still a lot of organizations that are only starting to plan the migration process.
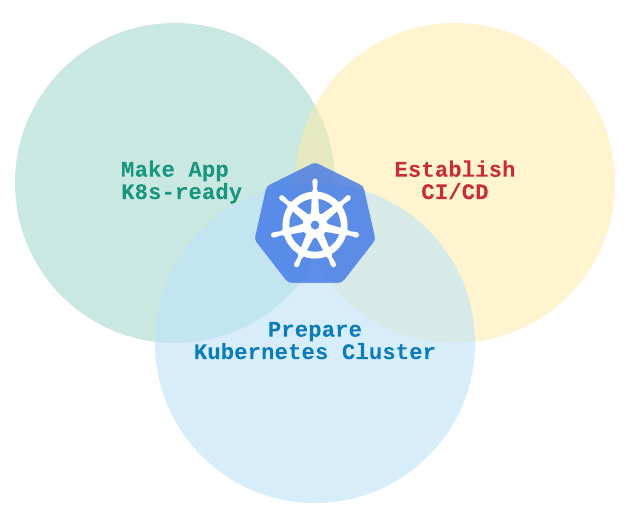
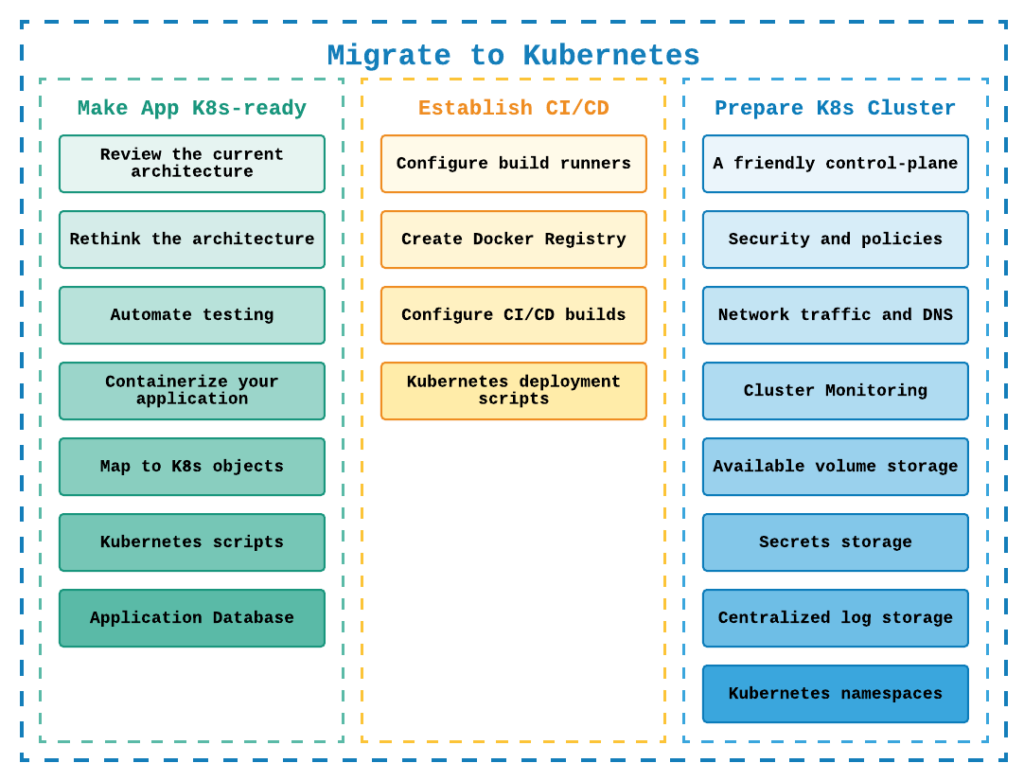
As a part of our work, we help and support such companies in their Kubernetes migration process. Here we would like to share the common steps and milestones that development teams should do to port their awesome app to K8s. In this article, we highlight the three major areas of this process:
- Make App K8s-ready
- Establish CI/CD Process
- Prepare Kubernetes Cluster
Before we start, it is worth mentioning that work on all these areas can happen in parallel.
Additionally, we know that every application has its unique architecture and, therefore, may have its own migration nuances. Despite this, we know there are typical milestones in the journey of every app migration.
Our intention here’s to highlight the process and guide you through it. Although we can’t give you an exact architectural solution for your app on Kubernetes; you can find out more from the steps below, and we are always happy to answer questions you have about this process.
Make App K8s-ready
The application migration process is pretty straightforward. We have to prepare each application part for Kubernetes deployment. But at the same time, this is not the most crucial aspect of the migration process. As your application may have a range of services and processes that should be moved to Kubernetes. However, there are still some activities in common across a wide range of apps:
1. Review the current architecture. Proper documentation or even just architecture diagrams will help you to build a migration plan, estimate the work involved, and conduct a productive dialog with your management related to the migration scope.
If you are lucky, or methodical, you will have documented every part of your application. List all of the components that will be migrated. Moreover, the tricky part is how to integrate them. You must consider all communication options that present in your application, whether it’s message queues or service buses, etc. The common diagrams like the deployment view or data flow chart or hexagonal view will be useful in this part of the process.
2. Rethink the architecture. Often teams are very enthusiastic at the beginning, — let’s migrate to Kubernetes, let’s replace monolith with microservices, let’s rewrite everything! 😊
However, based on experience doing this, we suggest not complicating your journey at the beginning. Try to port your components with minimal modifications, only a few essential features must be refactored. Without knowing app architecture specifics, we can’t give you the precise guide on how the architecture should look on K8s. But generally speaking, one of the main differences compared to the standard virtual machines hosting, is that your services will be ephemeral — they can be started or stopped at any time.
This provides scalability, but creates some challenges to overcome. Therefore, the next areas to modify — logging solution (move to centralized logging, e.g. ELK), shared memory and session storage (Redis), and file storage (external persistent volumes); plus anything else that needs to be modified before a migration.
3. Automate testing. Yep, this point is intentional, and pretty essential, in our experience. We strongly believe that the culture of automation can save you time and money, and keep stress levels low. You have to think about how you will test the migrated components. Do you have integration tests for them? Will you run the new and the old versions side-by-side and compare their results?
4. Containerize your application. Nowadays, it is not a difficult part to implement. There are a lot of ready-to-use Docker images for many frameworks and application runtimes. You can find examples and documents on how to Dockerize your component for each modern programming language. The main effort here is to adjust/replace/find libraries that will run on Linux. Additionally, some code changes might be required. Then you simply prepare docker files and test that they work.
5. Map to K8s objects. Kubernetes provides multiple objects and options that you can use to host your components, like deployments, services, endpoints, jobs, and other components. A useful exercise, at this stage, is to draw a draft of a new K8s architecture and choose the object types for your modules.
6. Kubernetes scripts. The next step is to create Kubernetes objects for your components. You should write YAML files for Kubernetes deployments, services, pods, jobs, and other components.
The scripts can be stored near each application component, or you can create a separate repository for those configurations. You can prepare and test such scripts on your local K8s setup, using minikube or Docker Desktop. Additionally, you can prepare scripts for some parts of your application infrastructure here, like setup RabbitMQ, Redis, or any other requirements.
7. Application Database. In most cases, you will leave your database as is and just connect to it from the new Kubernetes application. But sometimes, you can include database migration to the native Kubernetes technologies; such as running PostgreSQL using Crunchy data.
An excellent exercise, and time saving exercise, is to port your workloads one at a time. Try to split your architecture into several small deployable parts. You will learn the process from the first small migration and then can apply it to the bigger components.
Establish CI/CD Process
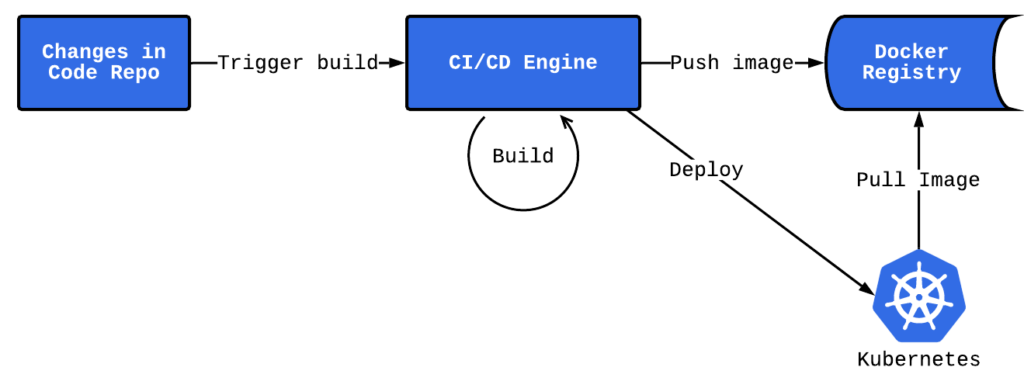
The stage, which is important and usually doesn’t get much attention, is to configure a delivery pipeline for your changes to Kubernetes. The desired CI/CD process is shown in the diagram below.
1. Establishing a CI/CD process starts with new changes in the source code repository.
2. Then, the CI/CD engine starts and executes the build process.
3. The outcome of the build is a ready-to-deploy Docker image with application files. This image is pushed to the Docker Registry.
4. The CI/CD engine fires the deploy process by updating the image version for the corresponding K8s deployment.
5. Kubernetes updates pods and pulls a new application image from the Docker Registry.
We assume that you already have the CI/CD tool so that we would start with the next steps for the migration process:
1. Configure Build Runners
What’s important at this stage, is that the result of the build process, which should be a Docker image. Which means the build runners used must support Docker, and be able to build your app and pack it into the image. Moreover, it would be better to have a Docker runner, where each build is executed inside the Docker.
This means you will have the ability to run multiple builds in parallel, and keep your build runners clean and not be overwhelmed by multiple frameworks and languages. So in this case, you need to prepare several build Docker images with corresponding frameworks.
2. Create or choose the Docker Registry
There are some private registries that you can run on your machines, or you can use one of the registries from cloud providers. Each provider has its own registry, they have similar functionality, and it is easy to use them, you just need to compare the prices for them.
3. Configure CI/CD builds
Here you should set-up the CI/CD process for your components, whether manually or if your tool supports configuration scripts. The best way is to write configuration (YAML or other) files that describe the build process inside each application repo.
It will be convenient for you to start your configuration-as-a-code process for the first application part and then reuse the scripts for other parts. Additionally, a useful best practice is to have a separate source code repository to store, build and deploy templates for commonly used applications and components.
4. Create Kubernetes deployment scripts
The last step in this milestone is to trigger the Kubernetes Admin API, then initiate the deploy process. Usually, Python or shell scripts are used for this.
For example, for Python, there are some Kube API client libraries that you can use for Kubernetes access and its resources manipulation. The goal of these scripts is to update the corresponding K8s deployment object with a new image version, then Kubernetes will do the rest of the work. You can start testing such scripts on your local K8s setup, or on a dev cluster if it’s ready.
Prepare Kubernetes Cluster
Kubernetes Cluster configuration is a complex process that involves several milestones. Best practice advice is to start with a simple version, and evolve it later. Don’t try and do too much from the start; choose only the components you require to migrate effectively.
As for the cluster creation, you can check the official docs and select there some trusted provider, like Rancher or similar technology. Additionally, all big cloud providers have their version of a managed Kubernetes cluster, which can be up-and-running in a few clicks.
We can’t provide exact install l instructions or scripts for the Kubernetes setup, because every app is configured and migrated slightly differently. But here, we have listed the components or artifacts that you should consider for your cluster.
- A friendly control-panel to use. You need an admin panel to manage all Kubernetes parts. It depends on how you will create your cluster; some tools already provide you with a nice UI for K8s management. But just in case here are some steps for kubeadm installation.
- Configured security and policies. Establish cluster security and organize user access control. Here official docs provide you with a great overview of what and how should be configured.
- Network traffic and DNS. Networking is an essential part of the cluster. Starting from some basic network policies, then setup ingress traffic, and including DNS configuration.
- Cluster Monitoring. Gather metrics and configure corresponding alerts on them. The standard combination here is Prometheus + Grafana. Or some ready-made products like New Relic, Dynatrace, DataDog, and others.
- Available volume storage. Most of the applications have some files to store. In this case, you must provide them with some persistent, resilient storage. For example, configure volume based on NFS or even AWS EBS, or other types of the storage class.
- Secrets storage. This is where sensitive data like connection strings, passwords, etc., can be stored more effectively. Again, Kubernetes offers you some options here, like its own Secret objects, or you can go with some other alternatives, for instance, AWS Secrets Manager.
- Centralized log storage. One of the most critical parts of your application is logging, you have to know what is going on in your services. Here you can establish your own logging solution, for example, based on ELK. Or use some log products Graylog, Logz.io, Splunk, and others.
- Kubernetes namespaces. Last but not least, is the K8s namespaces. You have to think about how to organize your cluster resources. Will you work in the default namespace or somehow create multiple namespaces with their own resource quotas?
The desired result here is to have all Kubernetes configuration as a source code, which is compliant with the IaC (infrastructure as code) approach. Often you have a separate repository where you store scripts for all Kubernetes objects. You can start with plain Kubernetes scripts and then combine them later into Helm Charts.
One beauty of Kubernetes is that you can recreate your cluster in any environment, it has the same API regardless of where you run it on bare metal or within a cloud provider.
Summary
We hope that these migration steps helped you to understand whether your application is Kubernetes ready or not, and how difficult it will be to port it to Kubernetes. You can use them to elaborate your own K8s migration plan and perform smooth migration later. Keep improving your app!
WANT TO KNOW HOW TO BUILD SCALABLE PRODUCT?
When developing a product, we follow these four critical rules to deliver high qualitydata development services.