Secure Service to Service Communication in AWS

Everyone knows how to secure user access to resources. It’s simple, as we have a person that can enter his login and password into the login form on his screen as prompted. Based on the received credentials, the authentication provider will generate a token, and a user will use this Token to access API or any type of application. But what should we do if there’s no user and the client of our API is another service? How can this service login and enter its credentials? How can it obtain the access token?
This type of communication is called service to service. Today you will learn how to secure it using AWS services, mainly via Amazon Cognito. We will start with a secure communication concept and then move to the implementation part, where we provide you with code samples.
Concept
Application structure
Let’s start with a typical application structure. Nowadays, almost any application has an API and some web or mobile clients. A user uses a login form to get a JWT token and then includes it with all requests to the API. The API validates this Token, retrieves information from it, like user name or roles, and then provides a response or not authorized message in some cases.
In the second step, we want to introduce a few other API consumers. These are background services that work without user involvement, for example, a service which creates and delivers emails. In the current setup, we have a secure public API that is consumed by the web client. At the same time, communication with other services also must be secured.
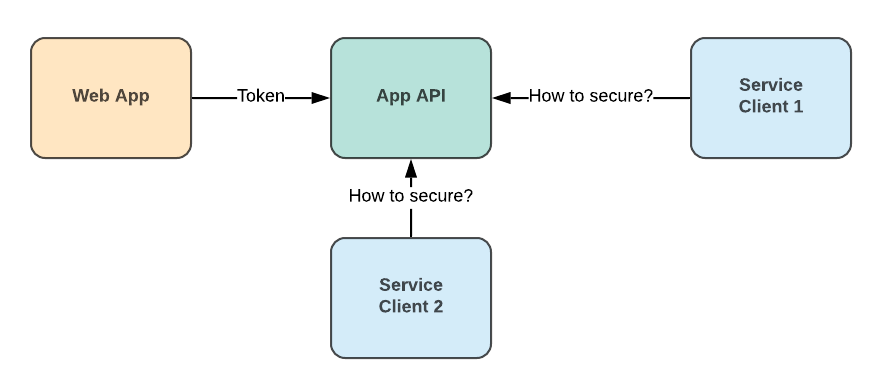
Common application structure
Application API as a resource
We can treat the application API as a resource provider or resource server. It provides several resources or endpoints to its clients. For example, let’s imagine that the first service client needs to export files. It should ask the API for the app-api\export resource. The second service client uploads new files into our store, so it consumes app-api\upload resources.
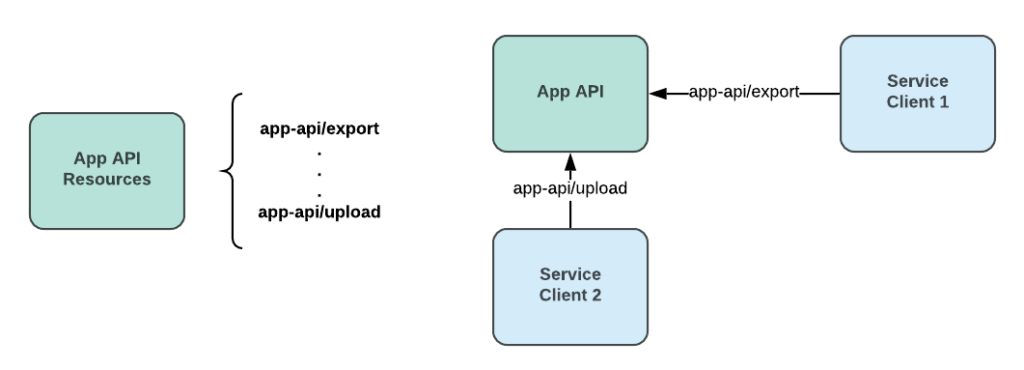
Application API resources
The resource server is a common practice to define the capabilities of your API or other application. Based on this, each service client can define what resources it needs and ask permission for them.
Service to Service Access Control in AWS
Luckily in AWS, we have an Amazon Cognito service that allows us to apply our resource server concept and organize service access control. We will just briefly describe the main parts of the Amazon Cognito. AWS has great official documentation on Cognito; please check it for more details.
User Pool, while it is a pool of users for the specific application, in our case, it works like a container for a closely related group of Resource Servers, services providing some functionality, and App Clients, consumers of resource servers.
Each App Client is assigned an Access Key/Secret Key pair, which this client can use to authenticate with Cognito Domain and receive JSON Web token. This Token is used to authenticate to one of the resource servers.
The granularity of access is controlled by Scopes. Each Resource Server can provide multiple scopes, like, export-file, upload-file, etc. Therefore, each App Client can have multiple scopes from multiple Resource Servers assigned.
It is then a responsibility of the Resource Server to verify the validity of JWT and whether this Token contains Scopes that allow performing an operation requested by an App Client.
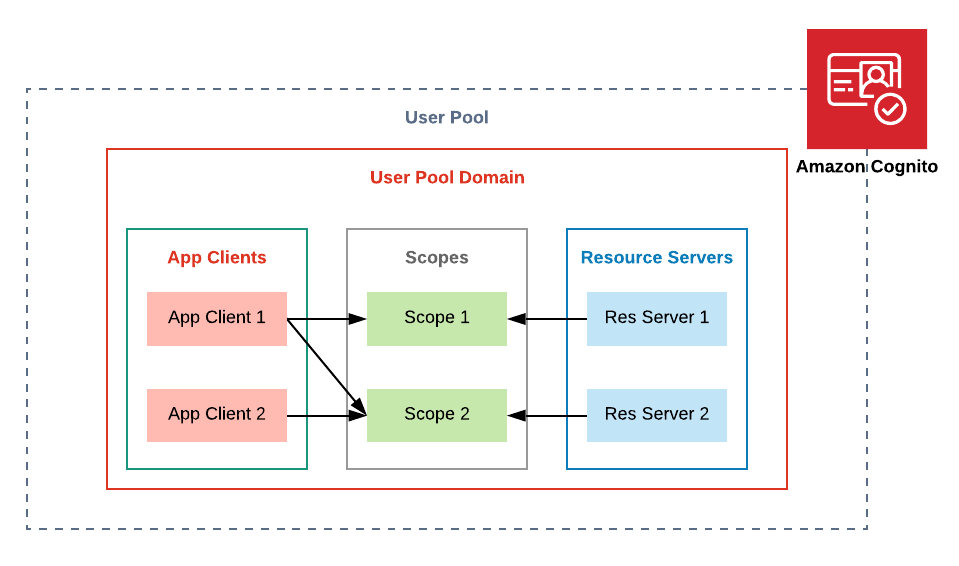
Amazon Cognito Resource Servers and App Clients
Secure Service to Service flow
The described Cognito parts allow us to create a secure communication flow based on the JWT access token. The process is simple and contains only a few steps.
1. Service Client asks Amazon Cognito to generate an Access Token.
2. Amazon Cognito creates the Access Token with the allowed scopes.
3. Service Client calls API with the provided Access Token.
4. API asks Amazon Cognito to validate the Token.
5. API returns a response based on the provided Scopes.
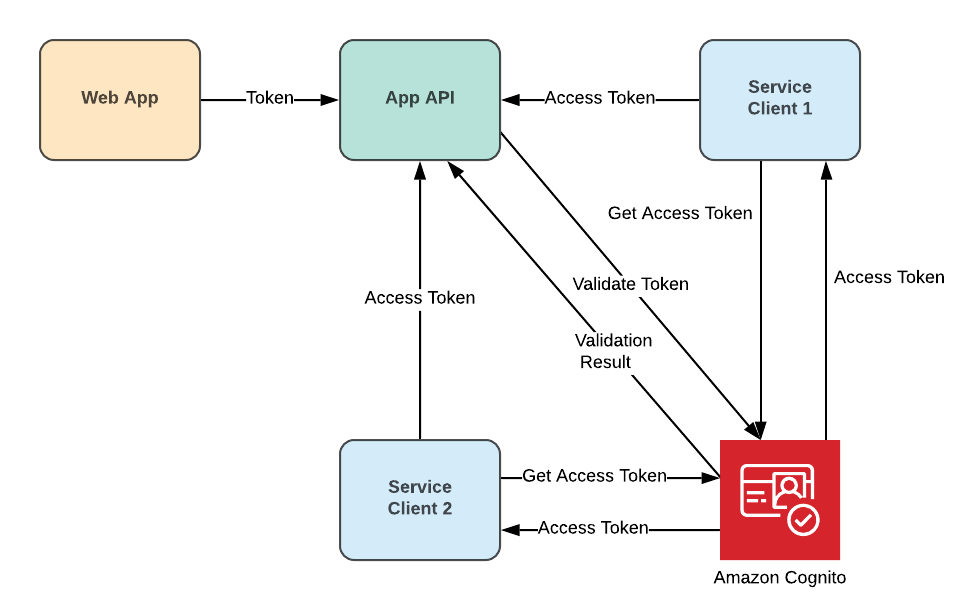
Secure service to service flow
Here a summary of the steps that should be performed to enable secure communication:
1. Create an Amazon Cognito User Pool with its own domain.
2. Add a new Resource Server and define its Scopes.
3. Create App Clients for your applications. Each service client has its Client ID and Client Secret.
4. Define settings for each App Client, what Scopes it can use, and the type of authentication flow. In our case, it is the Authorization Code Grant flow.
5. In each service client implement logic to request an Access Token.
6. Configure API to work with Access Tokens.
Implementation
Amazon Cognito Configuration
All the required parts of Amazon Cognito can be easily created with a simple CloudFormation script. You can examine it below. Moreover, you will get a great benefit here. The security configuration will be stored in the source code repository, and it will be easy to control any changes to it. This means you will know who and when changed access to application resources.
AWSTemplateFormatVersion: 2010-09-09
Description: Cognito User Pool.
Resources:
  UserPool:
    Type: 'AWS::Cognito::UserPool'
    Properties:
      UserPoolName: app-user-pool
  UserPoolResourceService:
    Type: 'AWS::Cognito::UserPoolResourceServer'
    Properties:
      Identifier: 'app-api'
      Name: 'App API'
      UserPoolId: !Ref UserPool
      Scopes:
        -
          ScopeName: export
          ScopeDescription: 'Export files'
        -
          ScopeName: upload
          ScopeDescription: 'Upload files'
  UserPoolClient:
    Type: 'AWS::Cognito::UserPoolClient'
    DependsOn: UserPoolResourceService
    Properties:
      ClientName: service-client
      GenerateSecret: true
      UserPoolId: !Ref UserPool
      AllowedOAuthFlowsUserPoolClient: true
      AllowedOAuthFlows:
        - client_credentials
      AllowedOAuthScopes:
        - app-api/export
  UserPoolDomain:
    Type: 'AWS::Cognito::UserPoolDomain'
    Properties:
      UserPoolId: !Ref UserPool
      Domain: app-user-pool
How to Generate Access Token
I will use C# language for examples, but this code can be easily re-written to any other language.
The next code snippet shows how to request an access token from Cognito. You should use your own ClientId, ClientSecret, Scope, CognitoAuthUrl. Where CognitoAuthUrl is the URL to Cognito Domain plus /oauth2/token suffix.
byte[] data = Encoding.UTF8.GetBytes($"{ClientId}:{ClientSecret}");
string token = Convert.ToBase64String(data);
string content = $"grant_type=client_credentials&scope={HttpUtility.UrlEncode(Scope)}";
var httpContent = new StringContent(content, Encoding.UTF8, "application/x-www-form-urlencoded");
_httpClient.DefaultRequestHeaders.Authorization = new AuthenticationHeaderValue("Basic", token);
var result = await _httpClient.PostAsync(CognitoAuthUrl, httpContent);
var token = JsonConvert.DeserializeObject<TokenInfo>(await result.Content.ReadAsStringAsync());
Amazon Cognito returns the next TokenInfo structure.
public class TokenInfo {
  public string access_token { get; set; }
  public int expires_in { get; set; }
  public string token_type { get; set; }
  public DateTime expires { get; set; }
}
How to Protect API
We will describe two implementation approaches here. One approach is a custom code that is needed to protect API based on ASP .NET Core. Another option is to use a native AWS Cognito Authorizer for API Gateway.
ASP .NET Core Example
There are a few steps for ASP NET Core API.
- Add an Authorization policy in the Startup class
services.AddAuthorization(options =>
{
  options.AddPolicy("ExportPolicy", policy =>
  policy.RequireAssertion(h => ClaimsValidator.CheckScopeClaim(h.User, "app-api/export")));
});
2. Create a Cognito Token Validator. Where CognitoPoolUrl is URL to Cognito Domain.
var parameters = new TokenValidationParameters
{
  ValidIssuer = "CognitoPoolUrl",
  RequireExpirationTime = true,
  ValidateIssuer = true,
  ValidateAudience = false,
  IssuerSigningKeyResolver = (s, securityToken, identifier, par) =>
  {
  string json = new WebClient().DownloadString(par.ValidIssuer + "/.well-known/jwks.json");
  return JsonConvert.DeserializeObject<JsonWebKeySet>(json).Keys;
  },
  ValidateIssuerSigningKey = true,
  RequireSignedTokens = true,
  RoleClaimType = roleClaimsType
};
JwtSecurityTokenHandler tokenHandler = new JwtSecurityTokenHandler();
ClaimsPrincipal principal = tokenHandler.ValidateToken(token, parameters, out _);
3. Use the Authorize policy to protect your endpoints.
[Authorize(Policy = "ExportPolicy")]
API Gateway Authorizer
The second option is to protect your API using Cognito Authorizer. This option is easy to implement when you have API Gateway on top of your API.
Then in the AWS Console choose API Gateway, go to Authorizers and create a new one. Select the Cognito type, enter an authorizer Name and choose your User Pool. Additionally, provide Token Source – the name of a header to read the access token.
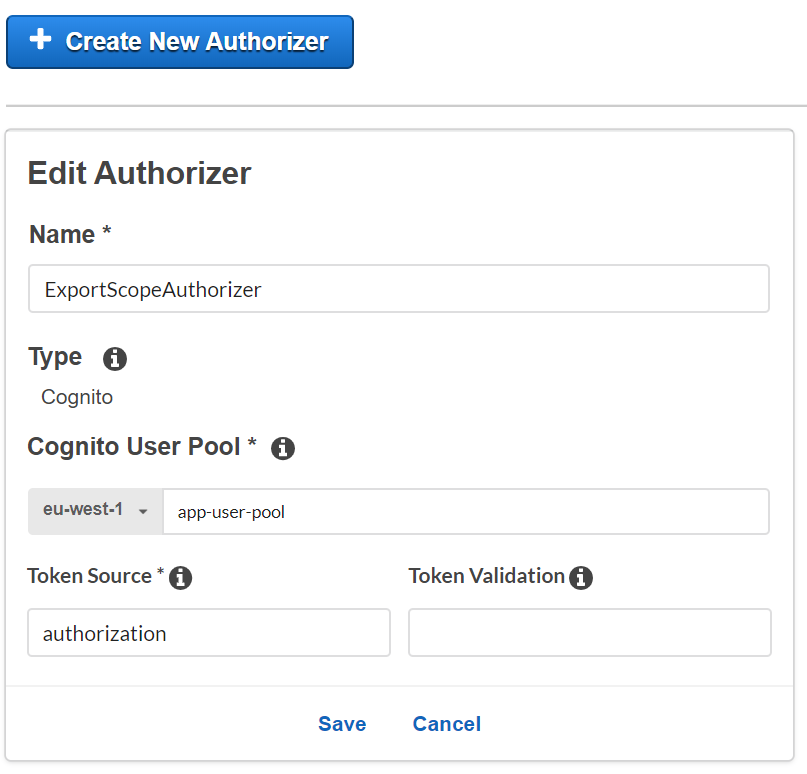
Create new Cognito Authorizer
Now you can use the created authorizer to protect your endpoints. Select the method and go to the Method Request settings. Here setup Authorization and select authorizer. Then for the OAuth Scopes enter one or multiple scopes that are required in order to access this endpoint.

Configure scopes for the API method/p
That’s it, only two steps are needed to secure your API with a built-in Cognito Authorizer.
Summary
Now you know that authentication can be performed without any user. Thanks to Amazon Cognito we have a great tool to establish secure service to service communication in AWS. It is simple to configure and work with. Moreover, all security settings can be managed via the source code. This opens up the perfect opportunity to organize the review and audit process for any changes in permissions.
Talk to our experts in end-to-end data engineering services to find out more about the topic and how your business or project can start benefiting from it today!
WANT TO BUILD A HEALTHCARE MVP BASED ON OPEN DATA?
Learn how to take a concept from a business problem to a functioning solution in a very short period.


